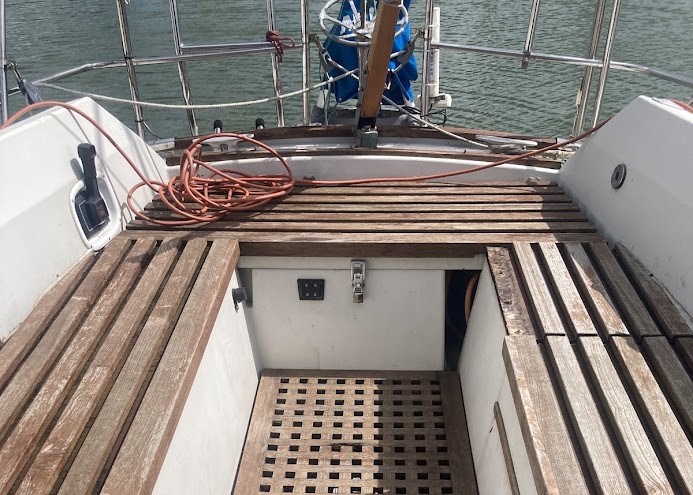
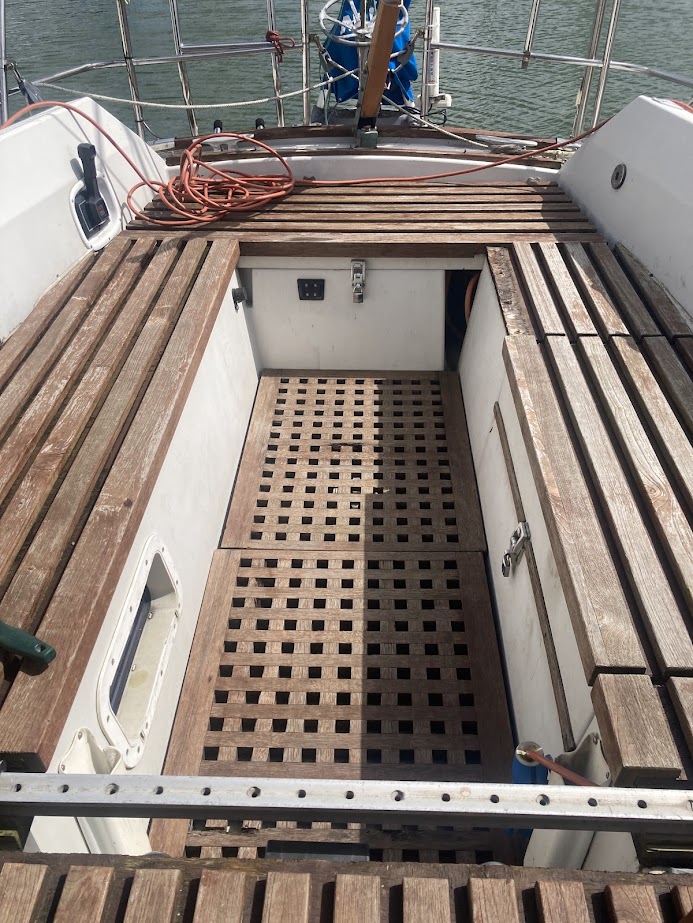
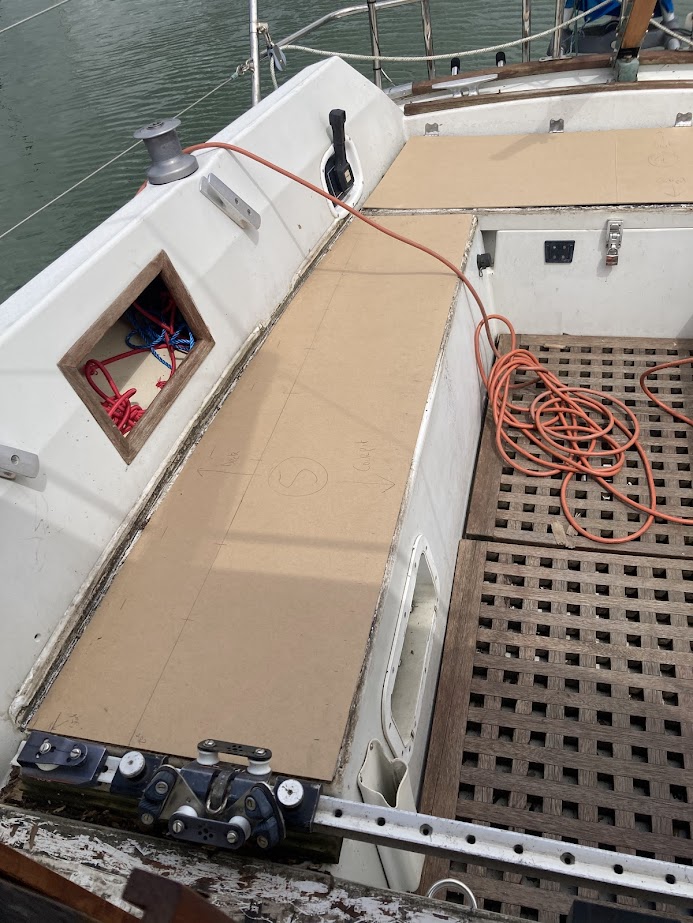
Last season I had realised that, while the teak on the cockpit deck seating was in reasonable condition, it was mounted onto plywood that was in poor condition. That is to say that it was waterlogged, spongy, and doing very little to keep the teak secure to the surface.
At the start of this season, I started thinking about a number of replacement options. I really like wood, but teak is not only expensive, but also – I understand from some fairly narrow reading on the subject – not particularly ethical. I therefore knew that I didn’t want to replace like with like and would need an alternative.
I looked at synthetic options, including Treadmaster, which appears to be quite widely used and is therefore likely to be, from a practical point of view, a good choice. I then came across Accoya Wood, which is Radiata Pine that goes through a process of acetylation that modifies the molecular structure of the wood leading it to have similar properties as slow growing tropical hardwoods. The price didn’t seem ridiculous, but I never did a full costing for the area I would need to cover.
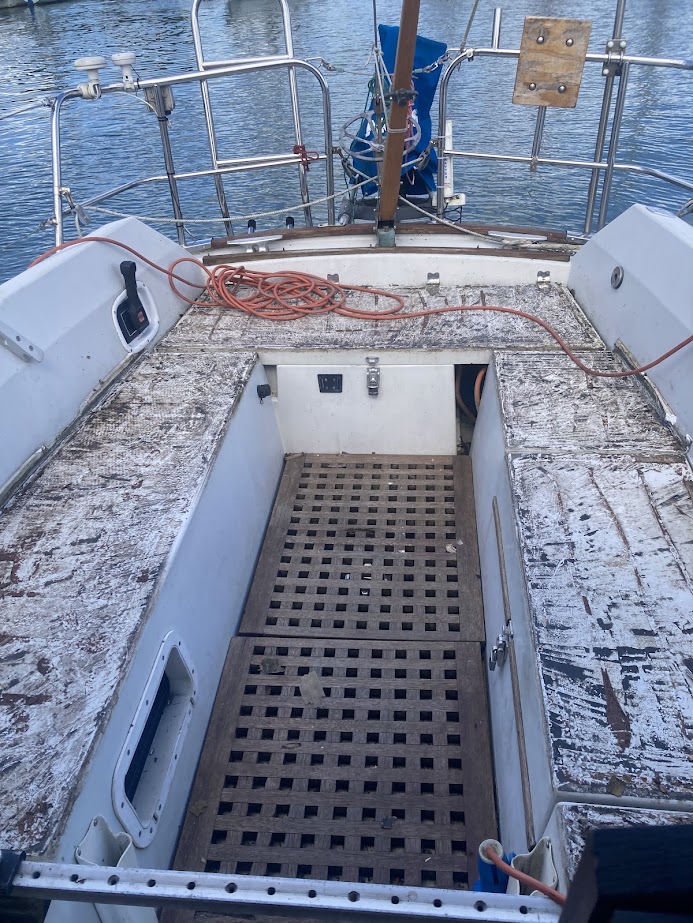
The solution came to me when a piece of the existing teak deck came off in my hands as though it were secured to a piece of soft cheese on the deck. It made me realise that, while the plywood that it was attached to was completely goosed, the teak itself was in remarkably good condition – so why replace it, why not repurpose it?
The existing deck that was approximately 40mm wide by 21mm depth strips had been screwed to the ply, and then the ply adhered to the deck with an 25mm gap between the strips.
This meant that using the current strips would require the same layout – I didn’t want to do that, as some strips had damage, and the failure of the ply was something I didn’t want to repeat. With the gap between the strips, what it did mean is that if I were to cut the strips in half lengthways, I would effectively double the surface area of teak available to me. It was a bit of a punt, but given that the gap between the strips was approximately 50% the width of the strips, this would give me enough and some to spare.
I was reserved about starting the project, but sometimes you just have to go for it. Finally, one Saturday afternoon in June of this year, I committed to the job and ripped up the cockpit deck. It didn’t take long – mainly because of the shocking condition of the ply – it all lifted easily. As I separated the teak from the ply, I taped it together as a batch for that panel of the cockpit and labelled it – I then drew a corresponding diagram so that I knew which lengths of teak needed to be re-engineered for which area of the deck.
Plugging the holes As the deck had been screwed to the ply, there were a series of holes along every length. Using a pillar drill, I cut approximately 200 plugs and used thickened epoxy to sink them into the teak. To get the best finish, I wanted to line the grain of the plugs with the grain of the strips. I was not always successful; however I was very happy with the results.


Cutting the teak in half
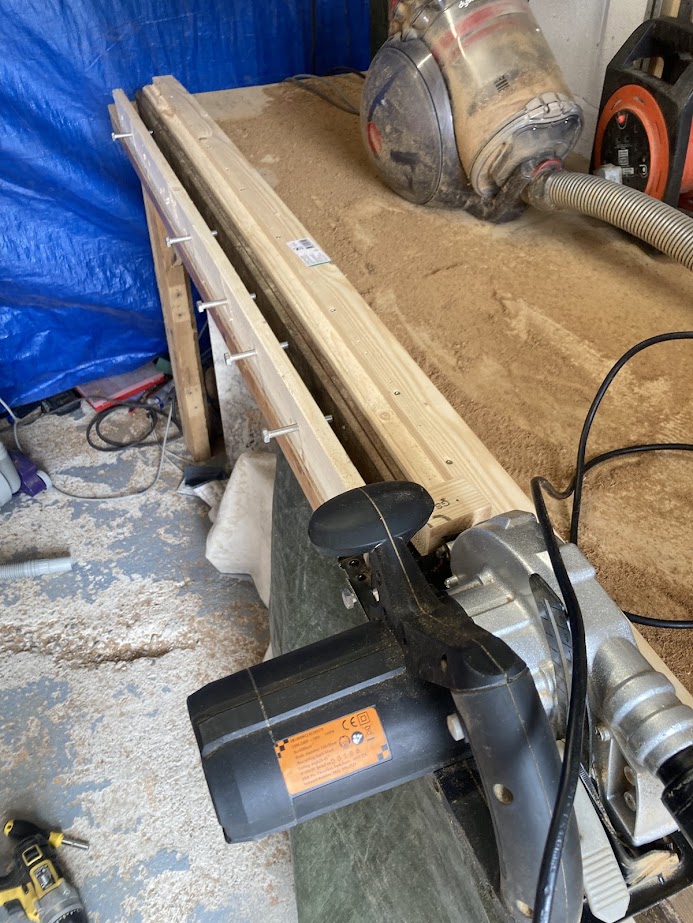
I knew that cutting the 2.1 cm thick teak strips in half would be challenging if I were to achieve my objective of having even strips thick enough to lay on the decks. I had considered a number of approaches, including hiring a bench saw, which would arguably be quicker, but of course more costly. I have a circular saw, but the existing blade was pretty ineffective across the grain and would be absolutely useless along the grain. My research led me to a Freud Wood Circular Saw Blade available from Screwfix for £22.99. What attracted me to this was the coarse ripping and cross cut capability, as well as the very narrow cutting kerf of 1.7mm. This blade, in many respects, proved to be the star of the show and I would highly recommend. The finishing cut was very smooth, requiring minimal sanding afterwards.
When there is a repetitive cutting process, I am a big believer in jigs as a means of cutting accurately, quickly and safely. I made a jig that would hold the lengths of teak in place, with a fence that would enable me to accurately cut along the centre line of each piece of wood. This worked well, though I did find that I was pushing a little hard against the fence, resulting in a marginal side-to-side taper of some of the teak strips. Once the jig was set up, the cutting process took approximately 7 hours, which I thought was pretty good.
MDF Template
Before cutting the teak to shape, I made MDF templates of the six deck panels. This meant that I would be able to shape the wood for fitting in my workshop at home, rather than on the jetty next to the boat.
Making the teak decks
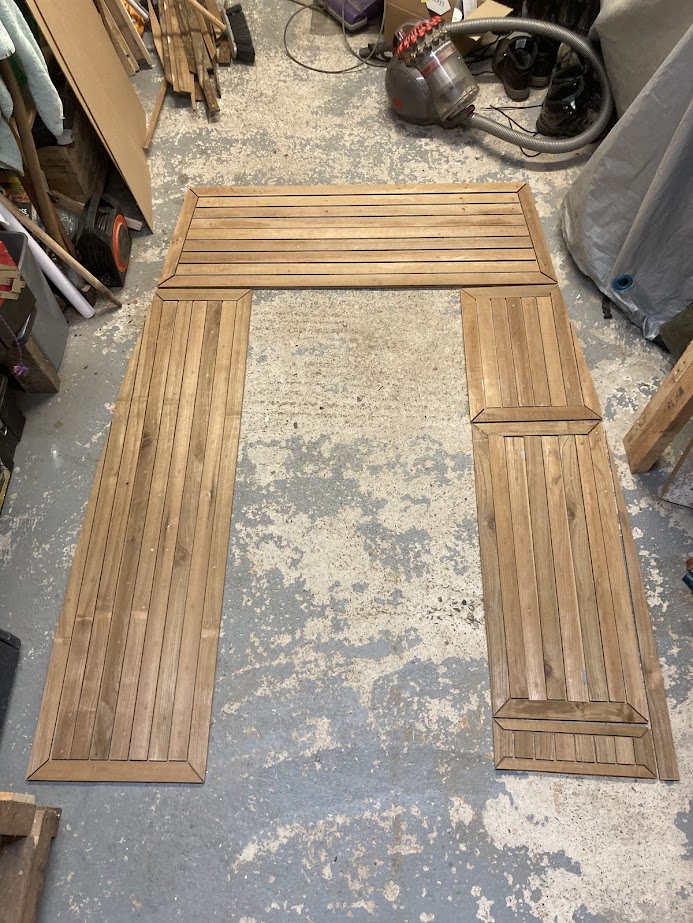
With every step so far being either deconstruction or preparation, it was a relief to be starting the ‘making’ part of the project. I had looked at teak deck designs and favoured a mitred finish. This, in my view, looks absolutely stunning and also has the benefit of minimising the end grain of the wood from being exposed to the elements. The disadvantage of this is that it would use more of the wood, which was already in limited supply, though I calculated that I would still have enough.
I used a laser guided mitre saw to cut the corner joints. The internal lengths were generally 90-degree edges, with the exception of the transom panel that was around 110 degrees as the cockpit narrows towards the stern. The principle of ‘measure twice, cut once’ was followed on every piece – I had so little spare wood that I couldn’t afford mistakes.
I then stuck each piece to the MDF panel, using double sided gorilla tape with 4mm tile spacers between. Seeing the panels emerge was immensely satisfying.
Scarfe joint
I would consider myself a good amateur woodworker. Like many amateurs, I have made my share of mistakes but conversely I have had my successes that I have been very pleased with.
The final panel to make was the section across the bridge to the companionway, a long narrow section. This had previously been in short sections running lengthways with the boat. To look right I needed to continue with the mitre panel approach, though did not have any teak strips long enough to run from port to starboard. To solve this problem, I took one of the longest spare strips and scarfed it to a shorter piece to give enough length.
I worked on a 6:1 ratio for the scarfe, cutting a back angle at the adjoining ends, enabling it to lock together. I then used thickened epoxy to attach the two pieces together, before clamping and leaving overnight.
I was extremely pleased with the result; while you can see the joint, it doesn’t stand out as obvious – you have to look for it.

Attaching the teak
Preparing the deck surface, I used a random orbital sander and 60 grit sandpaper and bonded the strips with thickened epoxy. In hindsight, I’m not sure that using the random orbital was the correct approach, as this produced a smooth finish. Alternatively, a belt sander would have given more of a grooved finish, enabling an improved mechanical grip with the epoxy. Having said that, it seems to have held very effectively. Using the thickened epoxy enabled some degree of levelling when the teak was of marginally varied thickness.
For each panel, I laid it out on the deck, and used blue masking tape to show where it needed to go. I used slow cure epoxy to give me time to make mistakes – had I used fast cure I would have been racing against the clock. I used 18 yoghurt pots filled with 800g-1kg of concrete as weights during the bonding process. This proved to be the correct weight and was enough to push down without squeezing all the epoxy out.
Caulking
I couldn’t believe how much deck caulking cost, though I did learn that there was a saving to be made. A 300ml Sikaflex 290DC PRO Deck Caulking Compound Cartridge from ASAP Supplies that goes into your standard mastic gun cost £24.28. A 600ml floppy tube comes in at £27.60. I calculated that I needed 2400ml in total so for the cartridge would be £194.24 whereas the same amount in the tubes would be £110.40 – a saving of over £80! I then bought some blank mastic gun cartridges from Amazon, at a fairly minimal cost. It was initially quite messy getting the caulking from the tube to the cartridge, but I did get better at this.
Finishing the job
The final step was to cut off the excess caulking and sand it down. This was the only step of the process that took me less time than I thought it would. I started initially with 60 grit on my random orbital sander and then finished with 120 grit and a coat of teak oil. There are a couple of spots where I need to go back over the caulking where there are voids but I’m saving that for another day.
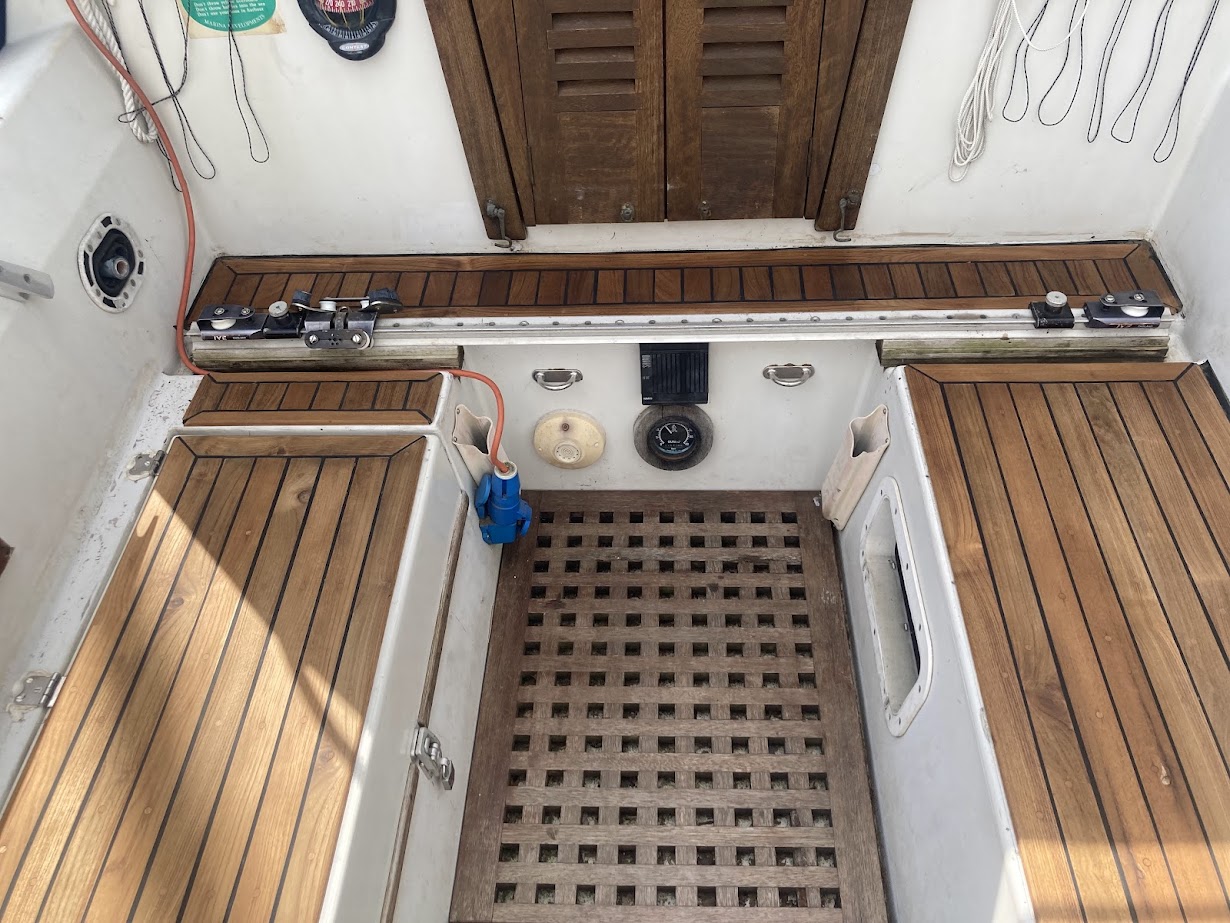

I couldn’t be more pleased with the results; I really feel it is what Trivial Pursuit deserves. A couple of weeks on and the teak is weathering, it has faded in colour and the grain has raised giving it a slightly rougher finish. I quite like that though, as it is a better grip under foot and is the natural process for the wood. I was given a top tip by Brian (our next door berth holder) who said only to sand and wipe over with teak cleaner and teak oil, NEVER scrub clean. He explained that when you scrub teak clean it appears that you are lifting dirt from the wood. However, this is in fact soft wood within the teak being lifted out. I’m no wood technologist, so unless someone who appears to know more than Brian tells me otherwise, that’s what I’ll be doing.

Leave a comment